


Seed pack tutorial
I've had a request to make a tutorial on how I make seed packs on Photoshop. I hope I can explain good enough for you to follow. So here goes..
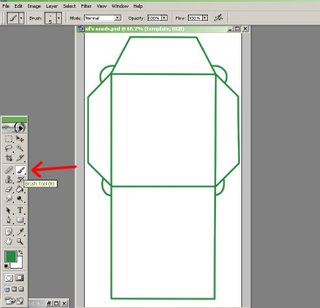 1. I used Becky's template design, drawing a new one. Make a new layer. Use the brush tool. To make a strait line, I make a spot, and then hold the arrow key down, and put the brush down at the end of the line. Draw up the template, or use mine!
 2. I wanted to use a piece of art I already had. You can use anything you like, pictures, textures.. etc. And decorate the template however you like.
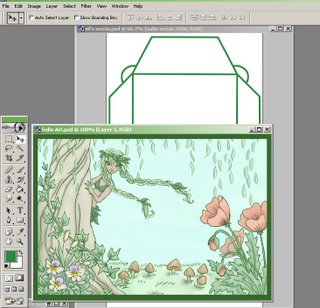
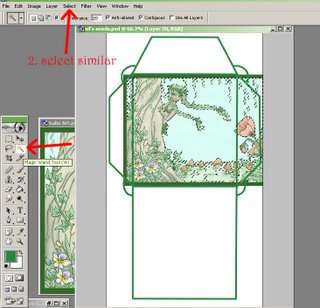 3. I dragged my artwork under the template. My piece of art was not the right size, nor did I want to use the blue sky (extra ink!) To get rid of a color, use the magic wand tool, and then "select/similar". Delete the color.
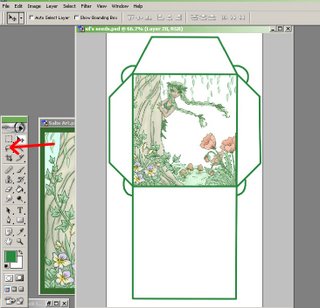 4. I cut the drawing in half using the lasso tool to make a new layer via cut (shft/cnrl/j). and then moved them together. Cut it to fit into the square.
 5. To type something, choose the type tool. I chose Harrigton, it's my fave font right now. I use a lot of fonts from Font Freaks and Font Mania. I extract the font to a folder called WINNT/fonts.
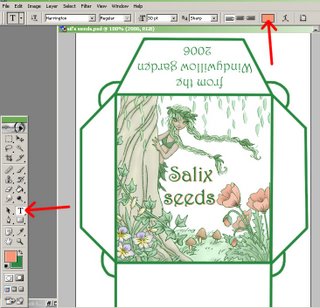 6. I did a double type and moved the second color down and over a bit. You can choose the color in the square up top. On the pack flap, I printed the words and then rotated them upside-down: "edit/ transform/ rotate 180o". This way, they will be rightside-up when the pack is glued together.
Now flatten all the levels. "Layer/flatten image" (on top bar)
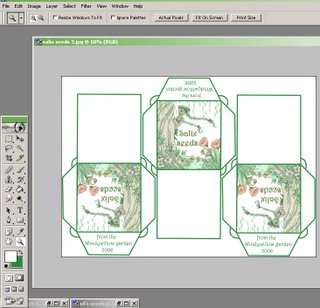 7. I dragged 3 templates on a new page, 1163 by 827 pixels. The size of typing paper. Remember you can turn them "edit/ transform/ rotate".
Flatten this, all done! Print out, cut and glue!
If I left anything out, or didn't explain well enough, do please ask!
1. I used Becky's template design, drawing a new one. Make a new layer. Use the brush tool. To make a strait line, I make a spot, and then hold the arrow key down, and put the brush down at the end of the line. Draw up the template, or use mine!2. I wanted to use a piece of art I already had. You can use anything you like, pictures, textures.. etc. And decorate the template however you like.3. I dragged my artwork under the template. My piece of art was not the right size, nor did I want to use the blue sky (extra ink!) To get rid of a color, use the magic wand tool, and then "select/similar". Delete the color.4. I cut the drawing in half using the lasso tool to make a new layer via cut (shft/cnrl/j). and then moved them together. Cut it to fit into the square.5. To type something, choose the type tool. I chose Harrigton, it's my fave font right now. I use a lot of fonts from Font Freaks and Font Mania. I extract the font to a folder called WINNT/fonts.6. I did a double type and moved the second color down and over a bit. You can choose the color in the square up top. On the pack flap, I printed the words and then rotated them upside-down: "edit/ transform/ rotate 180o". This way, they will be rightside-up when the pack is glued together.Now flatten all the levels. "Layer/flatten image" (on top bar)
7. I dragged 3 templates on a new page, 1163 by 827 pixels. The size of typing paper. Remember you can turn them "edit/ transform/ rotate".Flatten this, all done! Print out, cut and glue!
If I left anything out, or didn't explain well enough, do please ask!
posted by Silvia Hoefnagels . Salix Tree | 1:36 pm
![]()
1 Comments:
**********************
iHanna said...
what a nice tutorial, thanks!
5:10 PM
*************************
Post a Comment
<< Home